Wednesday 31 December 2008

Rustic (Scruffy) Flower

I needed a rustic unfussy looking flower for this card I was making, had a play and came up with this rustic looking flower.

I punched out 3 circles - 1 x 1.5" in blue, 1 3/4" in gingham and a 3/4" in blue

Distress the edges of the circles with a distressing tool and a nail file. Don't be afraid to crumple/crease the discs, crumpled and bashed is GOOD! Edge the discs with a matching ink and add a few more bends and creases for good measure. Assemble with a brad - the one I've used is from the QVC Cosmo Cricket TSV and was perfect for the look I wanted.

A really quick and easy embellishment that matches perfectly with whatever colours/papers you are using on your project (apologies for the blurred picture).

Bev

Monday 29 December 2008

Bubbles!!!

Many people have used the bubble wrap and paint to create a design on their layouts. I decided to try Tim Holtz's distressing ink. This may not be a new technique to many of you ,but it's the first time for me. I've used paint before but the ink made nice lightly colored bubbles on the paper.

Here are some pics I took when I created my layout.

I inked the bubble wrap...
...then I layed it on the paper and lightly pressed on it......and this is what it turned out like! Here is the layout I created.

Deanne

Tuesday 23 December 2008

Gift Card /Treats Bag

Easy and Quick!! You can use this to put a gift card, money or a small gift such as a pair or earrings in.


1. Seal an envelope.2.Using a tag punch or a tag that you have in your stash, cut out tags on each side of the top of the envelope. You may have to play with the amount of paper you want to cut away. You want it to look like a little basket or bag. 3.Once you get it looking like you want, then it's time to embellish!4.Here's my gift bag that I made. Cute idea!!!


May you have the gladness of Christmas - Which is Hope ;
The Spirit of Christmas- Which is Peace;
The Heart of Christmas - which is Love

Flip Square Album Video Tutorial


Hope you have a Great Xmas !

Jana

Friday 19 December 2008

Shaving Cream card background

What do you think? When I first read in a magazine a couple of weeks ago about marbelling using shaving cream I thought the magazine was run by madmen but it actually works out really well. I've since played around with the technique and created an easier way of creating my backgrounds with acrylic paints instead of inks!!

To create –

1. Cover the base of your container with shaving cream and spread it so that it is roughly covering the bottom of the container by at least a centimetre.

2. Squirt paint over the surface of the shaving cream. I used 2 different coloured green but you could easily use more than two colours or even use different contrasting colours like red and green.


3. Use the back of your paint brush and swirl the colours together through the shaving cream until you are happy with the effect you are seeing.

4. Place you card flat on top of the shaving cream mix and gently press the card onto the surface of the mixture. Using both hands, lift the card straight up and place onto a flat surface. Use the scrapper to gently scrape away the excess mixture on your card to reveal a swirly paint effect on your surface, much like marble.

5. Leave to dry thoroughly then use to create your card.

inexpensive ways to colour your stamps

I really enjoy finding ways to colour your stamps in an inexpensive way. Here is a card i made recently and id like to show what i used.

For this tutorial you will need:


regular Crayola pencil
regular water colours
staZon ink pad
water colour brush

heres some pics of the ones I use. I can grantee you'll race off to the kids room and pull out those supplies you thought were only for the kids!
I use the SazOn ink as it is a permanent ink and wont run when you use the water colours. Stamp on your background in a random fashion.

next use the white crayola pencil to colour santas hat. Remember these pencil are a wax base and depending on how much pressure you put on them is how dark they will come out. Its good to experiment with that. I pressed these colours quite hard to get good coverage in circle motions. A tip i use the white pencil to mark my darker cards when making projects it handy to have.


Now you could leave it like this but i decided to colour the rest of the hat red even though the card was red it still had a great effect. The red just stands out that much better.

With the water colours i used a watery black and a scrap of paper as a pallet i could wipe off the excess darker paint. Go around the outside of each of the hats blending the colour out. This will make the hat pop out at you off the card.

and the finished background with added glitter.....

So really you don't have to have to use all the expensive fang dangle pens and colours to achieve a great result just learn to use what you may already have.
heres a couple more cards i make with the same water colour pallet.


I hope you have enjoyed this tutorial and my find some some ways to take a few financial short cuts........Valita

Tuesday 16 December 2008

How to use Google Reader Video Tutorial

You have the wider version here

Hope it will be very useful as it is for me
Jana

Sunday 14 December 2008

Xmas mini Accordion Tutorial


This little boot can make a great mini for a fast album, I have all step by step pictures and template here to download.
Enjoy !
Jana

Making Butterflies using Flowers

I saw these done a couple of years ago but maybe some people have never seen them so I decided to show you how to do it...

I will show you pics of how to do it using 3 different shapes of flowers:
Snip one petal off...
And you have a butterfly!
With a 4 petal flower, simply trim off the tips of 2 petals
and tadaa...a butterfly!Here's another one.Just trim off 2 petals and there's a butterfly!Sorry about the poor quality of pics but it's so dark and dreary here this morning. The weather is sooooo yucky today.
Here's card I made using one of the flower butterflies!

Hope you liked the tutorial!
Happy Holidays!
Deanne

Customised Felt Embellishments!

Foam stamps have the advantagd of being much "thicker" designs - much bolder, I mean. They don't have a lot of detail at times, which is not so good for paper scrapping but quite handy for stamping on to fabric or felt.

Using felt has become the latest scrapping craze but it can get a bit expensive. If you have a Cuttlebug , Cricut or Sizzix you can run felt through it but that relies on the Dies you have, which can also be a bit costly.

Most craft shops have kids foam stamps for a very small price and they often have fantastic designs.

For this tip I have used some "Animal Crackers" stamps found in my local Spotlight store which cost 99cents for a packet of 6 designs.
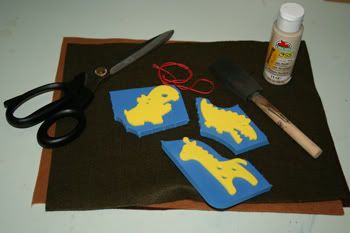
You need:

Bold design foam stamps

acrylic paint

square tipped foam brush

felt

container of water to wash out your brush.

Photobucket

Step One:

You can either cut out your individual felt areas to stamp or you can stamp on the whole felt sheet. Paint an even, slightly thick layer or acrylic paint onto your foam stamp .
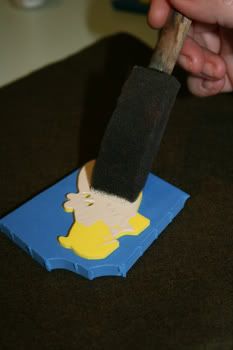
Photobucket

Step Two:

Press the foam stamp onto the felt firmly and leave on for a second or two. Don't press too hard or the excess paint will squelch out the sides of the stamp. Don't press too lightly or you won't have the entire image.
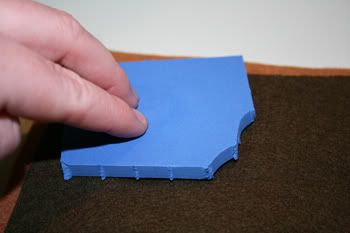
Photobucket

Step Three:

Leave your stamped felt to dry at least 1/2 an hour before cutting it out. Preferably longer if the weather is cool.


Photobucket


Now all you need to do is cut out the felt shape and use it in your scrapbooking page. There are many ways you could alter the shape even more - I have stitched around the outside of my shapes using a plain chain stitch, but you could also use a blanket stitch - especially is you stamped in pastel colours onto white felt - that would be perfect for a baby layout!
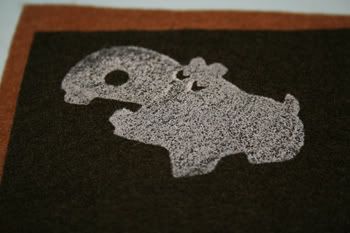
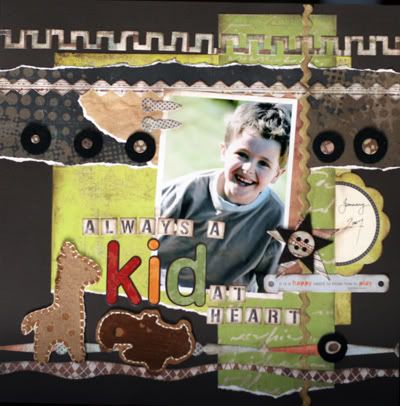
Here's my example:

Photobucket

There are so many different types of foam stmps out there that the mind boggles with how many different custom-made felt embies you could make.
For many more tips and techniques for your paper and digi scrapping, please visit my Blog Leonardo's Apprentice - I'd love to see you there!

Have fun and happy scrapping!

Sares x

Thursday 11 December 2008


I have had many emails and requests for making embellishments for cards and scrapbooking layouts.. so in view of demand lol i will show you how to make a snowman family. It is slightly different from the earrings , and i have also made a tutorial of the holly and berries , i did have a little help from you know who too !

Now if i was to send a card with fimo on , i would definatly put it in a strong box for posting .. fimo is delicate and i wouldnt think it would survive being shoved through a letter box !
Also if you was to use it on a layout i would make sure nothing heavy goes onto of your scrapbook.


So here goes ! REMEMBER TO WASH YOUR HANDS BEFORE AND WHEN YOU CHANGE COLOURS.
1. roll a ball of white fimo
.

2. Roll this into a sausage shape .


3. Next we are going to cut the bodies and the heads , The first is the dad snowman body - cut roughly about 2 cms , then the head 1 1/2 cm . Mum - body 1 1/2 cm head 1cm , child snowman -body 1cm , head just alittle over 1/2 cm. These measurements are only a guide , so long as it looks in proportion , thats ok.


4. Keeping them in order- ie - dads body , dads head etc .. roll each one into a smooth round ball.


5. next we have to taper the ends of each body. Place the pad of your finger just on top but on the side of the ball and roll back and forth until the end looks like a tear shape.
Flattern this with your finger and then gently press the head onto the body - just use alittle of the taper end or he will look a bit neckless !

6. now we have all three snowmen , its time to add the hat . first roll a red ball of fimo , flattern slightly with the pad of your finger and cut in half. Place one half onto the top of the head - tap gently to secure. With the other half left over roll this back into a ball then into a tear shape (just like we did for the body ) Cut the end of point off and gently push onto the hat - tap to secure - and remember also it needs to be flat against your surface. This is shown on the picture as 1- ball, 2 - tear shape - 3 cut off point.


7.its time to add the scarf . first roll a small ball of white fimo and then asmall ball of red fimo . Roll each of these into a thin sausage shape . Pick up both ends with your thumb and index finger and lift up so it dangles . Using your other hand , twist the fimo from the bottom- becareful not to over twist as it will break off.


8. Cut off a small piece and wrap around the front of the snowmans neck.


9. cut two smaller pieces for the scarf. Then roll a very small ball of red and gently tap this onto the scarf join.Repeat for the other two snowmen.


10 , Using some orange fimo , roll into a ball , then a thin sausage shape. Cut out 3 tiny triangles for noses and using your knife to gently pick it up with, place on the face and tap gently.


11. For the mouth -Now take your straw and cut the end off at an angle - so it looks like a half moon shape. Test the shape on a piece of spare fimo , once your happy with the shape gently push into the face - you can position them with different smiles - ie at the side.


12 - The eyes- for the eyes i used a cocktail stick - gently push in and twist it as your taking it out .... hmmmmmm i appear to have lost mine ..........
WHERE IS IT MISTER ????

THANK YOU CALVIN MOUSE !

Right back to crafting !

13.Place your dad and mum snowmen together. gently tap the sides so they stick to each other.
Because there is a gap underneth the child it needs to be filled to keep it the same height as the other two. Roll a small ball of white fimo and place this just between the mum and the dad.

14. Now place the child ontop.
15. For the arms. - roll small sausage shapes and gently tap onto the sides. For dads hand around mum , roll a small tear shape and press gently over her shoulder .


Now all three are ready for baking . I bake on a tile or plate (not used for food) and bake as per instructions on the clay packet.
ONCE baked - leave to cool . On the video i show you how to make the holly and to make your snowmen look furry. Its not the best vid in the world lol but it gets alot clearer at the end.
.

There is a video on my blog http://madimaginations.blogspot.com/
on how to make the holly leaves and make your snowmen look furry !

love maddy